
Golf Grip Basics: How to Hold a Golf Club Correctly

Quick Answer
Golf grip basics start with placing the club across the fingers of your lead hand. Add your trail hand so both palms work together, then hold the club with light, steady pressure. A relaxed hold supports a wider swing and cleaner contact, as this PGA grip-pressure tip explains.
Five Golf Grip Basics
- Lead hand first: Run the grip diagonally across the base of your fingers, not deep through your palm.
- Close the fingers: Wrap your fingers before placing the thumb just right or left of center.
- Add the trail hand: Cover the lead thumb while keeping both palms roughly facing each other.
- Connect the hands: Choose an overlap, interlock, or ten-finger grip based on comfort and control.
- Reduce pressure: Hold firmly enough to control the club without tightening your wrists and forearms.
Quick Check
- Make three waist-high swings. The club should feel secure, while your wrists remain free to hinge.
Golf grip basics can look simple until you try to place both hands correctly. Small changes in hand position can affect comfort, clubface control, and shot direction.
I have adjusted my grip more often than any other part of my setup. This guide covers hand placement, grip styles, pressure, sizing, common mistakes, and practical checks.
In This Guide
What Is a Golf Grip, and Why Does It Matter?
A golf grip can mean two related things. It describes how your hands hold the club and the rubber or polymer handle fitted over the shaft.
Definition: Your golf grip is the connection between your hands and the club. It influences how securely you control the shaft and how the clubface returns to the ball.
The clubface is the part of the clubhead that strikes the ball. Its direction at impact strongly affects where the ball starts.
Your grip does not work alone. Swing path, alignment, posture, ball position, and impact location also shape every shot.
What a sound golf grip should do
A useful grip gives you control without making your hands rigid. It also helps both hands work as a connected unit.
- Support the club: The grip should not slip or twist during the swing.
- Control the face: Your hands should help return the clubface predictably.
- Allow wrist motion: Your wrists need enough freedom to hinge and release.
- Reduce tension: Your fingers should control the club without squeezing through your forearms.
- Create repeatability: You should be able to place your hands the same way before each shot.
What the equipment rules say
The USGA Equipment Rules define a golf club grip as material added to the shaft to provide a firm hold. The grip must remain fixed, plain in form, and attached to the end of the shaft.
Non-putter grips normally need a circular cross-section. Their maximum cross-sectional measurement is 1.75 inches, or 44.45 millimeters.
These rules matter most during equipment changes. A standard replacement from a recognized grip maker will normally meet the rules when installed correctly.
Why beginners should check the grip first
The grip is one of the few setup parts you cannot repair halfway through the downswing. A poor hand position follows the club through the entire motion.
When my shots begin curving more than usual, I check my hands before changing my swing. That simple check has often exposed a lead hand that slowly moved out of position.
Do not rebuild your grip after one poor shot. Look for a repeated pattern across several controlled swings.
Section takeaway: A useful grip balances security, freedom, and repeatability. It supports clubface control but does not replace sound swing mechanics.
How Do You Hold a Golf Club Correctly?
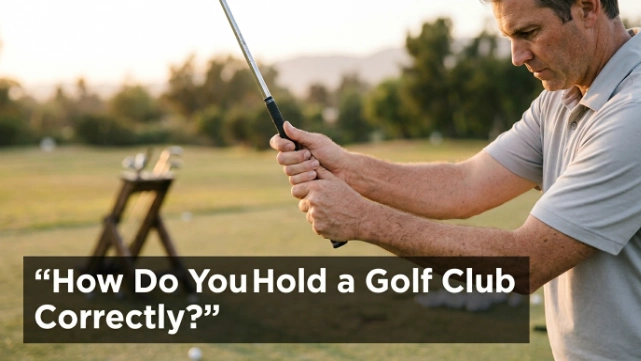
Place your lead hand on the club first. Position the handle through the fingers, close the hand, and then add your trail hand.
For a right-handed golfer, the left hand is the lead hand. Reverse every left-and-right instruction if you play left-handed.
Step 1: Position the club before gripping it
Stand the club in front of you with the face square to a target. Hold the shaft around waist height with your trail hand.
A square face points toward the target rather than noticeably left or right. Starting square makes your hand checkpoints easier to judge.
Step 2: Place the grip through the lead-hand fingers
Let your lead arm hang without forcing the palm to face the ground. Bring the handle toward the hand instead of twisting the arm around it.
- Rest the grip near the base of your little finger.
- Run it diagonally toward the middle joint of your index finger.
- Wrap the last three fingers around the handle.
- Close the index finger and thumb without squeezing.
- Set the heel pad over the top of the grip.
The heel pad is the firm area below your little finger. It should help support the club when your fingers close.
If the handle sits deep across the palm, wrist movement may feel restricted. A grip placed only in the fingertips may feel unstable.
Step 3: Check the lead-hand position
Look down without moving your head far from its normal address position. Many golfers see about two lead-hand knuckles from a neutral starting point.
This is a checkpoint, not a universal law. Hand shape, arm position, and wrist structure change what each golfer sees.
The crease between your lead thumb and index finger creates a “V.” In a neutral grip, that V often points between your trail ear and shoulder.
Step 4: Add the trail hand
Bring your trail hand to the side of the handle. Let its lifeline settle over the lead thumb.
The lifeline is the main crease running through your palm. Covering the lead thumb helps connect the hands.
- Place the handle across the middle sections of your trail-hand fingers.
- Wrap the middle and ring fingers around the grip.
- Connect the little finger using your chosen grip style.
- Rest the index finger lightly around the handle.
- Place the thumb slightly to the target side of center.
Avoid pushing the trail hand too far underneath the handle. That position can make the trail hand dominate the swing.
Do not place it completely over the top either. Both palms should feel as though they roughly face each other.
Step 5: Test the completed grip
Set the club down and make three slow, waist-high swings. Keep your hands in place between repetitions.
- The club should remain secure.
- Your wrists should hinge without strain.
- Your forearms should feel relaxed.
- Your hands should stay connected.
- The clubface should return without a forced twist.
I use short shots for this test because a full driver swing can hide the cause. A half-swing with an iron gives clearer feedback.
Pro tip: Ask a certified PGA Professional to check your grip if the position causes pain or feels forced. A coach can account for your hand shape, mobility, and normal ball flight.
Section takeaway: Build the grip from the fingers upward. Place the lead hand first, cover its thumb with the trail hand, and test the result using small swings.
Which Golf Grip Style Should You Use?
The three common full-swing grips are overlap, interlock, and ten-finger. None is automatically correct for every golfer.
Your best choice should keep the hands connected without causing pain. It should also feel repeatable at normal swing speed.
| Grip style | How the hands connect | May suit | Possible concern |
|---|---|---|---|
| Overlap | Trail little finger rests over the gap between the lead index and middle fingers. | Golfers wanting connected hands with moderate finger freedom. | Can feel insecure for smaller hands or weaker fingers. |
| Interlock | Trail little finger links with the lead index finger. | Golfers who prefer a close connection between both hands. | A deep interlock may pinch or add finger tension. |
| Ten-finger | All ten fingers touch the club without overlapping or interlocking. | Beginners, juniors, or golfers wanting maximum finger contact. | The trail hand may become too active. |
Overlap grip
The overlap is also called the Vardon grip. Place the trail little finger over the gap between the lead index and middle fingers.
This style joins the hands without locking them tightly. It remains a practical starting point for many adult golfers.
Make sure the little finger rests naturally. Pressing it hard into the gap creates tension before the swing starts.
Interlocking grip
With an interlock, the trail little finger and lead index finger link together. The connection can feel secure for golfers with smaller hands.
Do not force the fingers deep between each other. Their sides should connect without twisting or pinching.
I used too deep an interlock when I first tested this style. My hands felt connected, but the tension spread into both wrists.
Ten-finger grip
The ten-finger style resembles a baseball grip, although the hands still touch. Every finger contacts the handle.
It can feel natural for new golfers and players with limited finger strength. Juniors may also find it easier to form.
The main risk is trail-hand dominance. Keep both palms facing each other and avoid squeezing harder with the lower hand.
How to compare the three styles
Test each style with the same club and target. A short iron works better than a driver for this comparison.
- Hit several waist-high shots with the overlap grip.
- Repeat the test with the interlock.
- Finish with the ten-finger style.
- Compare comfort, contact, and starting direction.
- Reject any grip that causes pain or finger pressure.
Do not choose a grip because a famous player uses it. Tiger Woods, Jack Nicklaus, and other elite golfers have shown that more than one style can work.
Section takeaway: Overlap, interlock, and ten-finger grips can all be effective. Choose the style that connects your hands without discomfort or excess tension.


Should You Use a Strong, Neutral, or Weak Grip?
Most beginners should start near neutral. Strong and weak describe hand rotation, not grip pressure or physical strength.
A strong grip turns both hands away from the target. A weak grip turns them more toward the target.
| Position | Lead-hand view | Typical face tendency | Useful starting point |
|---|---|---|---|
| Strong | More knuckles may be visible. | May make the face easier to close. | Golfers whose hands sit too far toward the target. |
| Neutral | About two knuckles often show. | Offers a balanced reference position. | Most golfers learning basic hand placement. |
| Weak | One knuckle or fewer may show. | May make the face harder to close. | Golfers whose hands sit too far away from the target. |
What is a neutral golf grip?
A neutral grip places both hands near their natural hanging positions. The palms face each other while the grip sits across the fingers.
For many right-handed golfers, both hand “V” shapes point near the right ear or shoulder. Left-handed golfers reverse that reference.
The Golf Digest guide to making the hands work together also stresses matching the position of both palms. One strong hand and one weak hand can create conflicting forces.
What is a strong golf grip?
A strong grip rotates the hands away from the target. A right-handed golfer turns both hands clockwise around the handle.
This position may help some golfers who struggle to close the clubface. It does not guarantee a draw or cure every slice.
A slice can also come from an out-to-in swing path, heel contact, poor alignment, or several combined faults. Treat the grip as one part of the diagnosis.
What is a weak golf grip?
A weak grip rotates the hands more toward the target. A right-handed player sees fewer lead-hand knuckles at address.
This position may suit a golfer whose clubface closes too quickly. However, moving too weak can make a rightward miss worse for some players.
Should you change your grip to fix a slice or hook?
Check your grip when the same curve appears across several shots. Make small changes rather than rotating both hands to an extreme.
- For a repeated slice: Check whether the lead hand has turned too far toward the target.
- For a repeated hook: Check whether both hands have rotated too far away from the target.
- For mixed misses: Inspect contact, alignment, and swing path before blaming the grip.
- After an adjustment: Use half-swings until the new position feels stable.
During practice, I mark the center of the clubface with impact spray. That stops me from blaming hand position when heel or toe contact caused the curve.
Pro tip: A certified instructor can measure face angle, swing path, and strike location. Get those facts before making a large grip change.
Section takeaway: Start near neutral and adjust only when a repeated ball-flight pattern supports the change. Strong and weak grips are rotational positions, not pressure levels.
How Tight Should You Hold a Golf Club?
Hold the club firmly enough that it cannot move inside your hands. Keep the wrists and forearms relaxed enough to swing freely.
A useful starting point is around four on a scale of one to ten. Your exact number matters less than maintaining steady pressure.
Where should the pressure sit?
The strongest pressure usually comes from selected fingers rather than both palms. This helps secure the club without locking the wrists.
- Lead hand: Feel support in the last three fingers.
- Trail hand: Use the middle and ring fingers for control.
- Thumbs: Let them rest without pressing hard into the shaft.
- Index fingers: Keep them connected without forming stiff hooks.
- Palms: Use them to connect the hands, not crush the handle.
Pressure may increase naturally near impact. The goal is to avoid beginning the swing with maximum tension.
What happens when you grip too tightly?
Too much pressure can tighten the forearms and restrict wrist motion. It may also make your transition quick and forced.
Watch for these common signs:
- Your forearms feel hard before the club moves.
- Your shoulders rise toward your ears.
- Your wrists struggle to hinge during the backswing.
- Your hands become sore after a short practice session.
- The grip leaves deep pressure marks in your glove.
During a damp round, I once squeezed harder because the grip felt slick. The better fix was drying the handle and glove between shots.
Can a grip be too loose?
Yes. An overly loose hold lets the handle move inside your hands.
You may feel the club twist, especially on shots struck away from the face center. The fingers may also tighten suddenly during the downswing.
A relaxed grip is not careless. It combines secure finger contact with low forearm tension.
Common golf grip mistakes
- Handle across the palm: This can reduce wrist freedom and make the club harder to support.
- Hands separated: A gap between the hands prevents them from working as one unit.
- Opposing hand positions: One strong hand and one weak hand may fight for face control.
- Trail hand underneath: This can increase lower-hand action through impact.
- Long lead thumb: Stretching it far down the shaft may weaken support.
- Changing every swing: Constant adjustments remove any chance to judge a pattern.
- Ignoring worn equipment: A slick grip encourages unnecessary squeezing.
Three drills for a repeatable grip
Lead-hand support test: Form your lead-hand grip and briefly remove the trail hand. You should support the club without squeezing or losing control.
Three-swing pressure test: Make one swing at pressure two, one at four, and one at seven. Most golfers can identify when their forearms begin to tighten.
Checkpoint routine: Build your grip while holding the club in front of you. Check the face before lowering it behind the ball.
Practice these drills away from the course first. A new grip often feels strange even when its position is suitable.
Section takeaway: Use secure finger pressure with relaxed wrists and forearms. Dry, clean equipment is safer than squeezing harder when the club feels slippery.
How Do You Choose the Right Golf Grip Size and Material?
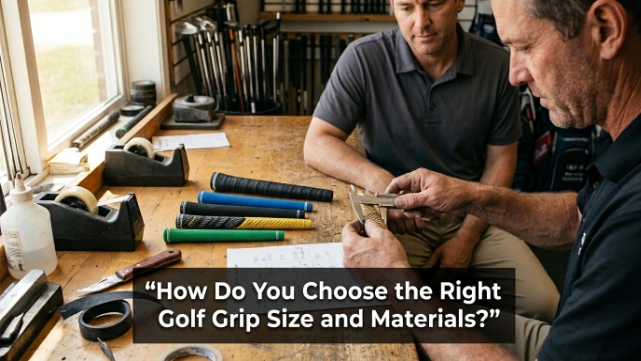
Choose grip size using hand measurements, glove size, finger contact, and comfort. Then match the material and texture to your weather and feel preferences.
Club brands such as Titleist, Callaway, TaylorMade, Ping, Cobra, Mizuno, and Srixon often sell clubs with standard grips. That stock size is not automatically the best fit for every buyer.
Golf grip size chart
Measure your lead hand from the wrist crease to the tip of the middle finger. Use the result as a starting point rather than a final fitting decision.
| Grip size | Lead-hand length | Example glove-size guide |
|---|---|---|
| Junior | Under 5 inches | Women’s extra small or junior |
| Undersize | 5 to 6.5 inches | Men’s small or women’s small to medium |
| Standard | 6.6 to 7.5 inches | Men’s medium or medium-large |
| Midsize | 7.6 to 9 inches | Men’s large or extra large |
| Jumbo | Over 9 inches | Men’s extra large and larger |
These measurements follow the published Golf Pride swing-grip sizing guide. Sizing can vary by model, core diameter, taper, and tape build-up.
How should the correct grip size feel?
Close your lead hand around the installed grip. Your longest fingers should lightly approach or touch the heel pad.
- Likely too small: The fingers dig deeply into the heel pad.
- Close fit: The fingers lightly touch or nearly touch the heel pad.
- Likely too large: A clear gap remains between the fingers and heel pad.
This test is a useful checkpoint, not a medical rule. Comfort, finger strength, arthritis, and preferred taper also matter.
Two to four extra tape wraps can create an in-between size. Ask a club fitter to measure the finished diameter if consistency matters across the set.
Rubber, cord, wrap, and hybrid grips
- Rubber grips: Offer a familiar balance of traction, feedback, price, and durability.
- Cord grips: Add woven material for traction in sweat, rain, and humid weather.
- Wrap-style grips: Use a spiral pattern that may feel soft and cushioned.
- Hybrid grips: Combine materials or textures across different hand areas.
- Polymer grips: Often feel soft and tacky but may require regular cleaning.
Players in humid climates may prefer cord or a firm texture. Golfers with sensitive hands may prefer a softer, larger grip.
Soft does not always mean secure. Test the grip with your glove and normal hand pressure before buying a full set.
Standard taper versus reduced taper
A traditional grip becomes narrower toward the lower end. A reduced-taper grip keeps more thickness beneath the trail hand.
Some golfers feel less need to squeeze a thicker lower section. Others lose useful feedback from their fingers.
Try both shapes on the same club type. Do not regrip every club until you have tested the new profile.
When should golf grips be replaced?
Replace a grip when cleaning no longer restores useful traction. Age alone cannot reveal its condition because storage, climate, and playing frequency differ.
- The surface looks smooth or polished.
- The rubber feels hard or brittle.
- Cracks appear near the lower edge or cap.
- The grip twists on the shaft.
- Paint, texture, or cord has worn away.
- You squeeze harder to stop the club from slipping.
Clean grips with mild soap, warm water, and a soft brush. Rinse them carefully and dry them before returning the clubs to your bag.
A grip that moves on the shaft needs immediate attention. Stop using that club until a qualified club repairer checks the installation.
Do putter grips follow the same basics?
Putter grips use different shapes and sizes because the putting stroke needs less wrist action. The hand-placement options also include conventional, cross-handed, claw, and prayer styles.
The R&A’s Rule 10 guidance explains that a player must not anchor the club or a gripping hand against the body. Merely touching clothing or the body is not always anchoring.
As of 2026, golfers can choose many legal putter-grip shapes. Check the current rules before using an unusual grip, split grip, or attachment in competition.
Pro tip: Consult a certified club fitter if you have arthritis, limited hand movement, or ongoing pain. A different size or softer material may help, but it should not replace medical advice.
Section takeaway: Treat grip size, material, and taper as fitting choices. Measure first, test one club, and replace any grip that remains hard, slick, damaged, or loose.
Golf Grip Basics FAQ
Which hand goes on a golf club first?
Place the lead hand on the club first. That is the left hand for a right-handed golfer and the right hand for a left-handed golfer. Add the trail hand after the lead fingers and heel pad securely support the handle.
How many knuckles should I see in a neutral golf grip?
Many golfers see about two lead-hand knuckles from their normal address view. However, hand shape and arm position affect this checkpoint. Keep both palms facing each other and avoid forcing your hand to match a fixed number.
Should I hold a golf club in my fingers or palm?
The grip should run mainly across the fingers of both hands. The lead heel pad then rests over the handle for support. Placing the club too deeply through the palm can restrict wrist movement and make the grip harder to control.
Is an interlocking or overlapping grip better for beginners?
Neither is better for every beginner. An interlock creates a close connection, while an overlap gives the fingers more freedom. Try both with short swings and select the style that feels secure without pinching, pain, or excess pressure.
Can changing my grip fix a slice?
A grip change may help when your hands sit too weakly and leave the clubface open. It will not fix every slice. Swing path, alignment, impact location, and ball position can create the same curve, so confirm the cause first.
Do I need the same grip size on every club?
Most golfers use a consistent size across their irons and woods. Putter grips commonly differ. Some players also adjust tape build-up or wedge grip length, but any change should have a clear fitting purpose.
How long does a new golf grip take to feel normal?
A noticeable change may feel unfamiliar for several practice sessions. Start with putting, chipping, and half-swings before using full speed. Keep the new position only if it remains comfortable and produces a more repeatable pattern.
Final takeaway: Start with a neutral, finger-based grip and light pressure. Keep both hands connected, test changes with short shots, and make sure the installed grip fits your hands. Check your hand position before every practice session until it becomes automatic.
If your grip feels painful or your misses remain unpredictable, book a lesson or club fitting. One informed check can prevent weeks of guessing.