
Golf Swing Guide 96: How to Build a Better, More Consistent Swing

Quick Answer
A reliable golf swing starts with a repeatable setup, smooth takeaway, balanced backswing, properly sequenced downswing, centered impact, and controlled finish. You do not need to copy a tour player’s positions. Build a motion that controls contact, clubface, swing path, and balance, and consider working with a PGA golf coach when you need hands-on feedback.
Golf Swing in 6 Simple Steps
- Build your setup: Establish your grip, posture, alignment, stance, and ball position before moving the club.
- Start smoothly: Move your chest, arms, hands, and club away without snatching the club back.
- Turn in balance: Complete the backswing without excessive sway, tension, or forced length.
- Sequence the transition: Let pressure move toward your lead side as your body starts unwinding.
- Control impact: Match the clubface, path, strike point, and low point to the shot you want.
- Finish balanced: Keep rotating through the shot until you can comfortably hold your finish.
Best Way to Check Your Swing
- Record face-on and down-the-line video, then connect what you see to strike location and ball flight.
Golf swings can look complicated because almost every body part moves during the motion. I prefer making the swing simpler by focusing on a few jobs that have to work together.
This golf swing guide covers the complete motion from setup through impact and finish. It also explains ball flight, club differences, common faults, and practical drills you can use in 2026.
In This Guide
What Is a Good Golf Swing?
A good golf swing is a repeatable motion that gives you useful control over contact, direction, trajectory, and distance. It does not need to look perfect.
The golf ball responds to the club at impact. Your setup and body movement matter because they influence how the club reaches that moment.
Definition: A golf swing is the coordinated motion used to move the golf club from address, through the backswing and downswing, into impact and a finished follow-through.
Consistency matters more than appearance
I have never found much value in chasing a position simply because a professional golfer reaches it. Two excellent players can use noticeably different backswings and still control the ball.
What matters is whether your motion keeps producing functional impact conditions.
- Centered contact: The ball regularly meets a useful part of the clubface.
- Clubface control: The face returns predictably enough to control starting direction and curve.
- Swing-path control: The club travels through impact on a path that supports your intended shot.
- Low-point control: The bottom of your swing arc appears in the correct area for the club and shot.
- Balance: Your body supports the motion instead of falling toward or away from the ball.
- Repeatability: You can reproduce the pattern when you move from the practice range to the course.
Understand the four impact variables
The clubface is the surface of the clubhead that strikes the ball. Its orientation at impact has a major influence on starting direction.
The swing path describes the direction the clubhead travels through the hitting area. The relationship between face and path helps determine curvature.
The strike point is the exact place where the ball contacts the clubface. Heel, toe, high, and low strikes can change both distance and direction.
The low point is the bottom of the clubhead’s swing arc. Good iron contact normally requires the ball to be struck before that low point.
- Driver: The ball is teed up, so the low-point requirement differs from an iron struck from turf.
- Irons: Ball-first contact normally places the lowest part of the arc after the ball.
- Wedges: Low-point control becomes especially important for predictable contact and distance.
Your body supports the club
Golf instruction often becomes confusing when every hip, shoulder, knee, wrist, and elbow receives a separate command. The body should instead support the club’s movement as one coordinated system.
I like to judge a swing by its results first. If contact, start direction, curve, and balance are improving, the movement is probably becoming more functional.
You can explore professional swing sequences through Golf Digest, but use them as references rather than positions you must copy.
Section Takeaway: A good golf swing produces useful impact conditions repeatedly. Judge the motion by contact, ball flight, balance, and control rather than appearance alone.
How Should You Set Up for a Golf Swing?

A strong golf swing starts before the club moves. Your grip, posture, alignment, stance, and ball position create the starting conditions for everything that follows.
I always check setup before making a major mechanical change. A small address problem can make a reasonable swing produce a poor shot.
Build your grip first
Place the club mainly through your fingers rather than burying the handle deep in your palms. Your hands should feel connected without excessive pressure.
- Lead hand: Place it on the club first and support the handle through the fingers.
- Trail hand: Fit it comfortably against the lead hand so both hands can work together.
- Grip pressure: Hold the club securely without making your wrists and forearms rigid.
- Grip style: Overlap, interlock, and ten-finger grips can all work.
Strong, neutral, and weak describe hand rotation rather than squeezing pressure. A near-neutral position gives many golfers a practical starting point.
Set athletic posture
Bend forward from your hips while keeping modest knee flex. Let your arms hang naturally beneath your shoulders.
Avoid sitting too far onto your heels or reaching excessively toward the ball. You should feel athletic and ready to move in either direction.
- Feet: Feel stable pressure through the middle of each foot.
- Knees: Keep them softly flexed rather than deeply bent.
- Hips: Hinge from the hip joints instead of rounding your upper back.
- Arms: Allow them to hang without forcing them toward or away from your body.
Aim the club before your body
Set the clubface toward your intended target first. Then organize your feet, knees, hips, and shoulders around that reference.
Aiming your body at the flag can make you feel square while the clubface points somewhere else.
An alignment stick on the ground gives better feedback. I use one for the target line and another for my feet when alignment starts feeling unreliable.
Where should the ball be positioned?
Ball position should match the club and shot. The goal is to place the ball where your swing can deliver the intended strike.
| Club | Practical Starting Position | Contact Goal |
|---|---|---|
| Wedge / short iron | Center to slightly forward of center | Ball first, turf second |
| Mid-iron | About one ball-width forward of center | Controlled descending strike |
| Long iron / hybrid | Farther forward while remaining inside the lead heel | Shallower strike near the bottom of the arc |
| Driver | Near the inside of the lead heel | Centered strike from a teed position |
These are starting points rather than universal measurements. Stance width, body proportions, club design, and swing pattern can change how each position looks.
Pro tip: If a setup or swing position causes pain, do not force it. A certified instructor can adjust the motion around your mobility and physical limitations.
Section Takeaway: Fix the setup before rebuilding the swing. A repeatable grip, posture, alignment, and ball position remove problems before the club starts moving.
What Is the Correct Golf Swing Sequence?
The golf swing sequence moves from setup into takeaway, backswing, transition, downswing, impact, release, and finish. These stages overlap rather than happening as separate poses.
That distinction matters. Trying to consciously control every position usually makes the motion slower and more complicated.
1. Takeaway
Start the club away smoothly while allowing your chest, arms, hands, and club to work together. Avoid suddenly pulling the handle behind your body.
- Stay organized: Keep the club and hands connected to your torso’s movement.
- Avoid rolling: Do not aggressively twist your forearms during the first part of the swing.
- Maintain balance: Your pressure can begin moving without your entire body swaying.
I like slow takeaways during practice because they expose unnecessary hand movement quickly. Once the first move becomes predictable, the rest of the backswing feels easier.
2. Backswing
Continue rotating your torso while the arms travel upward and the wrists hinge naturally. Pressure generally moves more toward the trail side.
Do not chase maximum backswing length. Stop when you have completed a controlled turn you can transition from.
- Turn: Let your torso and hips rotate naturally.
- Keep width: Maintain useful space between your hands and body.
- Hinge naturally: Allow the wrists to set instead of forcing an angle.
- Stay centered: Avoid sliding your entire body away from the target.
3. Transition
The transition is the change of direction between backswing and downswing. This is where many golfers rush.
Let pressure begin moving toward your lead side as the backswing finishes. You do not need to violently throw your hips toward the target.
4. Downswing
The lower body begins unwinding while the torso, arms, and club respond. The movements blend rather than occurring one at a time.
- Accept lead-side pressure: Begin moving pressure toward the target side.
- Start rotating: Allow your pelvis to begin opening.
- Let the arms lower: Keep them moving without pulling the handle violently.
- Rotate the chest: Continue turning through the hitting area.
- Build speed: Let speed increase toward impact rather than spending it at the top.
A common mistake is trying to create lag by holding the wrist angle. Functional lag tends to appear when the transition is organized and the club is not thrown from the top.
5. Impact and release
Impact is a moment, not a position you can consciously pose during a full-speed swing. The goal is to arrive with a useful clubface, path, strike, and low point.
The release happens as the club continues through the hitting area. Do not interpret release as deliberately flipping your wrists at the ball.
6. Finish
Keep rotating until your body faces the target and most pressure is supported by the lead side. A stable finish gives you immediate feedback about the swing.
- Balanced finish: You can hold the position comfortably.
- Chest through: Your torso continues rotating after impact.
- Trail heel released: The trail side follows the body’s rotation naturally.
- No falling back: Your weight does not remain trapped behind the ball.
I often judge practice swings by the finish before studying video. Losing balance usually tells me something went wrong earlier.
Section Takeaway: Treat the golf swing as one connected sequence. A smooth change of direction and balanced rotation matter more than trying to manufacture isolated positions.


How Do Clubface, Path, and Contact Control Ball Flight?
Ball flight is feedback. Instead of guessing what your body did, start by observing where the ball begins, how it curves, and where it contacted the face.
This approach keeps practice objective. It also prevents you from changing your swing because one movement looked unusual on video.
Start direction
The clubface at impact strongly influences the direction in which the ball begins. A face pointing right or left of your intended target changes that starting line.
Do not automatically blame swing path when a shot starts offline. Check the clubface and strike location as well.
Curvature
Curve develops from the relationship between the clubface and club path, along with strike location. That is why two swings moving in similar directions can produce different ball flights.
- Right-handed slice: The ball curves significantly right when the face is open relative to the path.
- Right-handed hook: The ball curves significantly left when the face is closed relative to the path.
- Left-handed golfer: Reverse the directional descriptions.
Trying to fix a slice by aiming farther left can make the problem worse. Your alignment may encourage an even more leftward swing path.
Strike location
You cannot diagnose every shot from curvature alone. Driver strikes toward the heel or toe can change the resulting flight.
Use removable impact spray or face tape during practice. It gives you immediate evidence about contact location.
- Center strike: Gives the clearest feedback about face and path.
- Heel strike: Can exaggerate certain curved flights with a driver.
- Toe strike: Can create different launch and curvature than a center strike.
- Low strike: Often feels harsh and can reduce useful launch.
- High strike: Changes launch conditions and may indicate a setup or delivery issue.
Fat and thin iron shots
A fat shot happens when the club strikes the ground too early. A thin shot contacts the ball too high on its surface or with the lower part of the clubface.
Both can come from low-point problems, but the underlying cause can differ.
- Ball position: An inconsistent starting position moves the ball relative to the swing arc.
- Pressure: Staying too far on the trail side can move the low point backward.
- Posture: Standing up or dipping dramatically changes your distance from the ball.
- Early release: Throwing the clubhead too soon can move the bottom of the arc behind the ball.
Use video and ball flight together
A swing that looks different from a professional model is not automatically faulty. Connect the video to a repeating shot pattern before changing it.
Film from face-on and down the target line. Keep the camera position consistent between recordings.
- Hit several shots toward the same target.
- Record the starting direction and curve.
- Check strike location on the clubface.
- Review the video for the earliest obvious problem.
- Change one variable.
- Repeat the test under similar conditions.
The governing bodies also maintain official information about golf equipment and the game. The R&A and USGA equipment resources are useful references when equipment questions enter your diagnosis.
Section Takeaway: Let the golf ball help diagnose the swing. Starting direction, curvature, strike location, and turf contact provide better evidence than changing mechanics from feel alone.
Should Your Golf Swing Change With Different Clubs?
The basic sequence stays similar across full swings, but your setup and delivery change with club length, loft, ball position, and shot choice. A driver should not be treated exactly like a wedge.
Loft is the angle built into the clubface. More loft generally helps launch the ball higher, although dynamic delivery also affects actual launch.
Wedges and short irons
Shorter clubs encourage a narrower setup and more controlled motion. You normally want the ball struck before the club reaches its lowest point on a standard turf shot.
- Ball position: Near center or slightly forward for many stock shots.
- Contact: Ball first, then turf.
- Priority: Distance and strike control rather than maximum speed.
I prefer learning swing changes with a wedge or short iron. Slower, shorter shots make the feedback easier to read.
Mid-irons
A 7-iron is one of my favorite practice clubs because it sits between short-game control and long-club speed. You can make full swings without feeling that every shot needs maximum effort.
Ball position normally appears slightly farther forward than with a wedge. The swing still needs a controlled low point after the ball.
Long irons and hybrids
Longer clubs create a wider swing arc and usually use a more forward ball position. The strike can become shallower than with a short iron.
- Avoid forcing height: The club’s loft should help launch the shot.
- Stay balanced: Longer clubs tempt golfers to swing harder.
- Move the ball gradually: Do not jump immediately to a driver-style position.
Driver
The driver changes the setup because the ball sits on a tee. Positioning it farther forward gives the club more opportunity to reach the ball later in the swing arc.
A common mistake is trying to hit down with the driver exactly as you would with a short iron. Another is leaning backward excessively in an attempt to hit upward.
- Tee the ball: Give the club enough space to strike the ball cleanly.
- Move it forward: Start near the inside of the lead heel.
- Create width: Let the longer club make a naturally wider motion.
- Keep tempo: Do not turn the driver into an all-out effort.
Does swing tempo change?
Your driver travels farther than your wedge during a full swing, but that does not mean you need a rushed transition. Keep the overall rhythm recognizable from club to club.
Some players naturally swing faster than others. The goal is repeatable tempo, not matching another golfer’s exact pace.
As of 2026, golfers have access to more video and launch-monitor feedback than ever. That technology is useful, but it does not replace centered contact and a predictable clubface.
Section Takeaway: Keep the core sequence while adapting setup and contact to the club. Ball position, swing arc, and strike goal should change gradually from wedge through driver.
What Golf Swing Mistakes Should You Fix First?
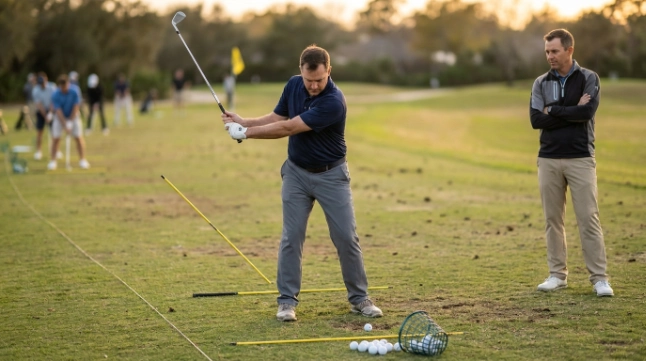
Fix the earliest meaningful problem you can identify. Later compensations often appear because something went wrong earlier in the swing.
This is one reason I avoid changing three mechanics during one practice session. You lose the ability to tell which change affected the shot.
Mistake 1: Poor alignment
A golfer can make a reasonable swing while unknowingly aiming several degrees away from the intended target. The resulting ball flight then encourages an unnecessary mechanical correction.
Place an alignment stick along the target line during practice. Set a second stick parallel to it for your feet.
Mistake 2: Excess grip tension
Squeezing the handle tightly can spread tension into the wrists, forearms, and shoulders. That makes a free takeaway and transition harder.
Hold the club firmly enough to control it without feeling rigid. Recheck pressure before each practice swing.
Mistake 3: Snatching the takeaway
A sudden hand-dominated start can move the club sharply inside or outside. Your body then spends the rest of the swing compensating.
Practice moving the first foot of the takeaway slowly. Blend the chest, arms, and club together.
Mistake 4: Overswinging
A longer backswing does not automatically create more useful speed. Extra length can hurt balance and make the transition harder to time.
Stop when your turn feels complete. Then begin the downswing without adding another forced movement.
Mistake 5: Rushing from the top
Many golfers try to create speed immediately after completing the backswing. The hands and shoulders race while the lower body has little time to organize.
Think smooth change of direction first. Let speed build as the club approaches impact.
Mistake 6: Trying to lift the ball
Golf clubs already have loft. Trying to scoop an iron into the air can move the low point backward and produce thin or fat contact.
With a normal iron from turf, focus on hitting the ball before the ground. Let the clubface provide the launch.
Four drills I would practice first
Good drills make a movement easier to feel while giving you feedback. Start below full speed before adding normal distance.
- Feet-together drill: Hit short shots with your feet close together to emphasize balance and rhythm.
- Half-swing drill: Make waist-high swings and prioritize centered contact.
- Alignment-stick drill: Use sticks to check target line and body alignment before changing mechanics.
- Pause drill: Make a controlled backswing, pause briefly near the top, and start down smoothly.
A simple 45-minute practice session
| Time | Practice | Main Goal |
|---|---|---|
| 5 minutes | Warm-up and slow rehearsals | Comfortable movement |
| 10 minutes | Wedge half-swings | Centered contact |
| 15 minutes | 7-iron practice | Direction and balance |
| 10 minutes | Hybrid or driver | Long-club control |
| 5 minutes | Random targets | Transfer practice to play |
Do not spend the entire session repeating one perfect range lie. Change targets and clubs near the end so you have to rebuild the routine before each shot.
The PGA TOUR can provide useful examples of elite ball flight and shot variety. Just remember that tour-player speed and mobility may differ greatly from yours.
Pro tip: A certified instructor should evaluate any swing change that causes joint, back, wrist, elbow, or shoulder discomfort. Golf positions should not be forced through pain.
Section Takeaway: Diagnose before you change. Fix setup and the earliest repeating fault first, then use slow drills and ball-flight feedback to confirm whether the adjustment works.
Golf Swing FAQ
What are the most important golf swing fundamentals?
The most important fundamentals are grip, posture, alignment, ball position, balance, swing sequence, clubface control, and centered contact. Start with setup before changing complicated mechanics because a poor starting position can make a functional motion produce inconsistent shots.
What should start the golf downswing?
Begin the downswing with a smooth change of direction as pressure moves toward the lead side and the lower body starts unwinding. Avoid pulling the club down violently with your hands. The torso, arms, and club should respond as the sequence develops.
How do I stop slicing the golf ball?
First check clubface orientation, swing path, strike location, grip, and alignment. A right-handed slice occurs when the clubface is open relative to the path. Do not automatically aim farther left, because that adjustment can encourage an even more leftward path.
Why do I hit iron shots fat?
Fat shots happen when the club contacts the ground before the ball. Common causes include poor ball position, staying on the trail side, an early release, and inconsistent posture. Check your divot location and record a face-on swing before changing several mechanics.
Should I keep my head completely still during the golf swing?
No. Your head does not need to remain frozen. Some natural movement occurs as your body rotates. Focus on maintaining balance and avoiding excessive lateral movement instead of trying to hold your head in one exact position.
How hard should I swing a golf club?
Swing hard enough to create useful speed without losing balance, contact, or sequencing. Many golfers improve faster by practicing at reduced effort first. Add speed only when the strike and finish remain controlled.
How often should I practice my golf swing?
Short, focused sessions can be more productive than occasional marathon sessions. Practice one priority at a time, use clear feedback, and finish with different clubs and targets. The quality and purpose of each repetition matter more than simply hitting a large number of balls.
Your next goal is not to build a perfect-looking golf swing. Build one you can repeat.
Start with setup, learn the sequence at a controlled speed, and let ball flight guide your adjustments. Make one change at a time, verify it with contact and video, then gradually transfer the movement onto the course.
That is how I would approach the golf swing whether I was rebuilding a motion from scratch or correcting a problem that appeared mid-season. Keep the process simple enough that you can still play golf instead of thinking about mechanics over every shot.