
Golf Hole Layout Explained: How to Read and Play Every Part of a Hole

Standing on a tee box can feel confusing when you are not sure where to aim, how far the hazards are, or which route offers the safest path to the green. A hole may look simple from the scorecard, yet bunkers, slopes, trees, water, and green position can completely change how it should be played.
Understanding a golf hole layout helps you select better clubs, avoid unnecessary penalties, and plan each shot before swinging. This guide explains the main parts of a hole, common design styles, strategic features, and a practical process for playing unfamiliar courses with more confidence.
Quick Answer
A golf hole layout is the arrangement of the teeing area, fairway, rough, hazards, bunkers, landing zones, and putting green from the start of a hole to the cup. Reading the layout helps golfers choose safer targets, manage distance, avoid trouble, and plan the most practical route based on their skill level.
What Is a Golf Hole Layout?
A golf hole layout describes how the playing area is designed between the teeing area and the hole on the putting green.
It includes more than the shape of the fairway. A complete layout may contain:
- Multiple teeing areas
- Fairway landing zones
- Rough and native grass
- Trees or out-of-bounds boundaries
- Fairway and greenside bunkers
- Ponds, streams, or marked penalty areas
- Slopes and elevation changes
- Doglegs
- Approach areas
- The putting green and surrounding fringe
Under the Rules of Golf, a course is divided into five defined areas: the teeing area, general area, bunkers, penalty areas, and putting green. The USGA explanation of the areas of the course is useful because different rules may apply depending on where the ball lies. (rules.usga.org)
A well-designed hole normally gives golfers choices. One route may be shorter but bring more hazards into play. Another may require an extra club into the green but offer a wider and safer landing area.
The Main Parts of a Golf Hole Layout
Teeing Area
The teeing area is where the hole begins. Most courses provide several sets of tees so golfers can play a distance suited to their ability.
The formal teeing area is a rectangle that:
- Begins between the outside edges of the two tee markers
- Extends two club-lengths behind the markers
- Does not include the ground in front of the markers
Do not assume the entire closely mown tee box is the legal teeing area. In stroke play, starting a hole from outside the correct area can result in a penalty and require the mistake to be corrected.
The choice of tees affects more than total yardage. It changes forced carries, landing-zone width, approach-club selection, and the angle from which hazards enter play.
Fairway
The fairway is the closely cut route that usually leads toward the green. It gives golfers a cleaner lie and more predictable contact than longer rough.
However, the center of the fairway is not always the best target. Some holes reward a shot to one side because that position provides:
- A clearer view of the green
- A better angle around a dogleg
- More room to avoid a greenside bunker
- A level stance for the next shot
The fairway is part of the general area under the Rules. The general area also includes rough and most other parts of the course that are not the current hole’s teeing area or green, a bunker, or a penalty area.
Rough and Native Areas
Rough is longer grass positioned beside the fairway or around the green. It punishes inaccurate shots by reducing control, distance, and spin.
Light rough may allow a normal shot. Thick rough can close the clubface, twist the club at impact, or cause the ball to fly with very little spin.
Native areas may contain tall grass, sandy waste areas, bushes, or natural vegetation. Their status can vary, so check the scorecard and local rules before taking relief.
Landing Zones
A landing zone is the part of the hole where a well-planned shot is expected to finish. A par-4 hole normally has a primary driving zone, while a par 5 may have separate landing zones for the drive and second shot.
Course designers influence landing zones with:
- Narrow fairways
- Cross bunkers
- Water
- Trees
- Slopes
- Changes in fairway direction
A hazard placed 250 yards from the back tees may be only 190 yards from a forward tee. That is why golfers should assess hazards from their own markers rather than relying on the hole’s appearance from another tee.
Bunkers
Bunkers are prepared areas of sand designed to influence both strategy and shot execution.
Common bunker positions include:
- Fairway bunkers: Challenge tee shots and layups
- Cross bunkers: Stretch across part of the fairway
- Greenside bunkers: Guard the putting surface
- Pot bunkers: Small, deep hazards with steep faces
- Collection bunkers: Catch shots that miss in a predictable direction
A fairway bunker may be more damaging than its size suggests. Even when the ball is playable, a high lip can prevent a full-distance shot toward the green.
Penalty Areas
Penalty areas are commonly marked with red or yellow stakes or lines. They often contain water, but a committee may define other difficult areas as penalty areas.
A golfer can sometimes play the ball as it lies. Otherwise, penalty relief is available under specific options for one penalty stroke. The available options depend partly on whether the area is marked red or yellow, as explained in Rule 17 from The R&A. (R&A)
Never enter deep water, unstable banks, dense vegetation, or protected areas to retrieve a ball. A lost golf ball is not worth risking injury or damaging the course environment.
The Approach Area
The approach area is the section immediately in front of and around the green. It may include closely mown grass, slopes, bunkers, rough, and collection areas.
The safest approach target is often not the flag. Beginners and intermediate golfers usually benefit from aiming toward the widest section of the green, especially when the hole is positioned near water or a deep bunker.
Putting Green, Fringe, and Hole Location
The putting green is the specially prepared surface where the cup and flagstick are located. Its layout can include tiers, ridges, valleys, false fronts, and slopes that direct balls away from certain positions.
The fringe or collar surrounds the putting surface. Although it may be cut short, it is normally part of the general area rather than the putting green.
Hole location matters because it changes the safest approach:
- A front hole location may bring a false front or front bunker into play.
- A back location may require more club but leave room short.
- A side location may punish shots aimed directly at the flag.
- A location near a steep slope can make the next putt difficult.


Common Golf Hole Shapes

Straight Hole
A straight hole runs mainly in one direction from the tee to the green. It may appear simple, but bunkers, narrow landing zones, slopes, and green position can still create strategic decisions.
Do not automatically hit driver. Identify where the fairway narrows and whether your normal driving distance reaches trouble.
Dogleg Left
A dogleg-left hole bends to the golfer’s left. A right-handed player who naturally draws the ball may be able to follow the shape, but trying to force an unfamiliar shot can produce a severe miss.
The safe plan is often to play toward the outside of the turn, leaving a slightly longer but clearer approach.
Dogleg Right
A dogleg-right hole bends to the golfer’s right. Cutting the corner can shorten the hole, but trees, rough, bunkers, and out-of-bounds areas frequently protect the inside line.
Only choose the aggressive route when you know the required carry and can produce the necessary shot reliably.
Double Dogleg
A double dogleg changes direction twice and is most common on par-5 holes. It rewards planning because each landing position affects the angle of the next shot.
Instead of trying to cover maximum distance, work backward from a comfortable approach yardage.
Split Fairway
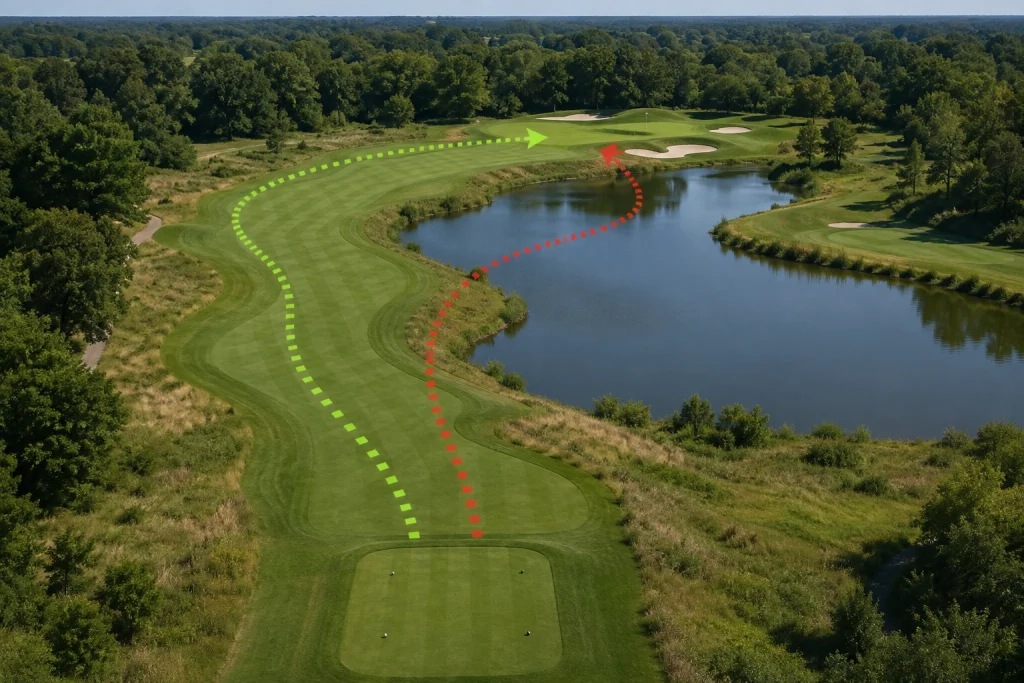
A split fairway gives players two visible routes. One side may be wide but leave a longer approach. The other may be narrow or require a carry but provide a better angle.
For most recreational golfers, the best route is the one that keeps the ball in play and avoids a difficult recovery—not necessarily the shortest route.
How Par Changes a Hole’s Layout
| Hole Type | Typical Challenge | Practical Strategy |
|---|---|---|
| Par 3 | Tee shot must reach or finish near the green | Aim for the largest safe section and choose enough club |
| Par 4 | Position the drive for an approach shot | Select a club that finishes short of major trouble |
| Short par 4 | Tempts golfers to drive near or onto the green | Compare the reward with bunkers, water, and lost-ball risk |
| Par 5 | Requires two or three planned landing positions | Decide early whether to lay up or attempt a long second shot |
| Short par 5 | Encourages aggressive second shots | Attack only with a good lie and a safe miss |
| Long par 5 | Tests distance and patience | Play toward reliable yardages instead of forcing long clubs |
Par describes the expected number of strokes for a skilled golfer under normal conditions. It does not tell you the safest way to play the hole.
A short par 4 with water near the green may demand more careful planning than a longer, open par 4.
How to Read a Golf Hole Before Playing It
1. Check the Hole Map and Yardage
Look at the scorecard, tee sign, GPS unit, or course app. Note the total distance, par, dogleg direction, and obvious hazards.
Remember that the listed yardage normally follows a measured route. It does not always represent the exact distance from that day’s tee markers to the current hole location.
2. Identify the Biggest Trouble
Find the feature most likely to add penalty strokes or create an impossible recovery.
This could be:
- Out of bounds
- Water
- A deep bunker
- Dense trees
- A forced carry
- Thick rough
- A steep slope
Plan away from severe trouble before thinking about maximum distance.
3. Find the Widest Landing Area
Estimate where your normal shot will finish, including roll. Then compare that distance with the width of the fairway.
A 230-yard club that reaches a narrow section may be less useful than a 200-yard club that finishes in a broad landing zone.
4. Choose the Best Angle
The shortest route is not always the easiest route. One side of the fairway may provide a better view or remove a bunker from the direct line to the green.
On approach shots, consider where you would prefer to miss. Short grass below the hole is usually easier than deep rough above it.
5. Select a Specific Target
“Hit the fairway” is too general. Choose a tree, bunker edge, mowing stripe, or distant feature that defines your starting line.
A precise target improves alignment and commitment.
6. Adjust for Conditions
Wind, temperature, elevation, firmness, and moisture can change how a layout plays.
A downhill fairway may add considerable roll. A soft uphill hole may play much longer than its scorecard distance. Firm greens can also make front-edge yardage more important than flag distance.
The USGA notes that selecting suitable tees involves more than total yardage because topography, forced carries, fairway width, hazards, and green design also affect playability. Its guidance on using course playability to select the best tees can help golfers make a more realistic choice. (USGA)
Expert Tip: Plan the hole backward from the green. Choose the approach distance and angle you want, then select the tee-shot club that gives you the best chance of reaching that position.
Safe Route Versus Aggressive Route
Many holes present a risk-and-reward decision.
| Decision Factor | Safer Route | Aggressive Route |
|---|---|---|
| Target area | Wider landing zone | Narrower or partially hidden target |
| Required shot | Familiar shape and distance | Long carry or controlled curve |
| Main benefit | Fewer penalties and easier recovery | Shorter next shot or possible scoring chance |
| Main limitation | Longer route to the hole | Greater chance of bunker, water, or lost ball |
| Best suited to | Most beginners and inconsistent players | Skilled players with a reliable shot pattern |
| Smart time to choose | Casual play, poor lie, strong wind | Good lie, known yardage, suitable conditions |
Aggressive golf is not simply using the longest club. A smart aggressive shot has a realistic target, a known carry distance, and an acceptable miss.
Do not choose a shot based only on the result you hope to achieve. Consider the result your normal swing is most likely to produce.
Choosing the Right Tees for the Layout
Playing tees that are too long can create repeated forced carries and require long clubs into nearly every green. That makes the layout frustrating and slows play.
A suitable tee should allow you to:
- Reach most fairways without carrying severe hazards
- Use a variety of clubs
- Attempt par-3 greens with a reasonable club
- Reach par-4 greens in two well-struck shots
- Play without repeatedly waiting for areas beyond your realistic range
Course Rating and Slope Rating can provide additional context. The USGA’s Course Rating and Slope Rating guide explains how ratings indicate difficulty for scratch and bogey golfers. (USGA)
Choosing forward tees is not a sign of poor ability. It is often the fastest way to experience the hole as its design was intended.
Do You Need a Rangefinder or GPS Device?
You do not need expensive technology to understand a golf hole layout. A scorecard, tee sign, sprinkler-head marker, and careful observation may be enough.
However, distance tools can improve decisions on unfamiliar courses.
| Tool | Cost Level | Main Benefit | Limitation |
|---|---|---|---|
| Printed scorecard | Usually free | Shows basic shape and listed yardages | Limited detail and may not show current conditions |
| Course yardage book | Low to moderate | Shows landing zones, slopes, and hazard distances | Takes time to interpret |
| GPS phone app | Free to moderate | Provides an overhead view and front-center-back distances | Battery use and accuracy vary |
| GPS watch | Moderate to high | Fast yardages without handling a phone | Small screen may hide layout detail |
| Laser rangefinder | Moderate to high | Precise distance to visible targets | Cannot measure hidden hazards without line of sight |
Quality matters more than unnecessary features. Look for clear displays, dependable measurements, weather resistance, and durable construction if you play frequently.
A distance device supports judgment; it does not replace it. Exact flag yardage is less useful when the correct target is the middle of the green.
Common Mistakes Golfers Should Avoid
- Automatically hitting driver: The longest club may bring fairway bunkers, water, or narrow rough into range.
- Aiming only at the flag: A dangerous hole location can turn a small miss into a large score.
- Ignoring carry distance: Total distance includes roll, but clearing water or a bunker requires reliable carry.
- Cutting a dogleg blindly: Trees may block the shot, and the direct distance may be longer than it appears.
- Following better players’ targets: Their distance, shot shape, and risk tolerance may be different from yours.
- Using the wrong tees: Excessive length can remove the strategic choices the designer intended.
- Failing to check local rules: Native areas, drop zones, cart restrictions, and environmentally sensitive areas may require special procedures.
- Changing strategy after one bad swing: A poor result does not always mean the plan was wrong.
- Playing while others are within range: Never attempt a shortcut or blind shot until the landing area is clearly safe.
When to Get Help From a Golf Pro or Fitter
Consider a lesson with a qualified golf professional when you understand the layout but cannot produce the shots needed to follow a sensible plan.
A pro can help when:
- Your tee shots curve unpredictably in both directions
- You do not know your average carry distances
- Fairway woods or long irons create frequent major misses
- Uneven lies cause repeated contact problems
- You struggle to select targets and manage risk
- Your scores rise sharply on unfamiliar courses
A professional club fitting may also help when your equipment makes distance control or consistent contact unusually difficult. However, equipment cannot correct every strategic mistake.
For many golfers, an on-course lesson provides more value than another club purchase because the professional can evaluate club selection, alignment, decision-making, and pre-shot routine in real situations.
FAQs
What is included in a golf hole layout?
A golf hole layout includes the teeing area, fairway, rough, landing zones, bunkers, penalty areas, approach area, putting green, and surrounding boundaries. It also includes elevation, slopes, doglegs, and the strategic angles between these features.
Why do golf holes have different tee boxes?
Different tee boxes change the length, angle, and difficulty of the hole. They allow golfers with different driving distances and skill levels to play a layout that provides reasonable landing zones and approach shots.
What is a dogleg in golf?
A dogleg is a hole that bends left or right between the tee and green. Golfers must decide whether to follow the wider route around the bend or attempt a shorter, riskier line across the corner.
Should I always aim for the center of the fairway?
Not always. The center is often safe, but one side may provide a clearer angle to the green. Your target should balance fairway width, hazards, your normal shot shape, and the position of the hole.
How do I know where to lay up on a par 5?
Work backward from the green and choose a comfortable approach distance. Then select a layup club that finishes at that yardage without bringing unnecessary hazards into play.
Is the fringe part of the putting green?
Normally, no. The fringe or collar is generally part of the general area, even though it is closely cut and surrounds the putting green. This distinction can affect marking, lifting, and relief procedures.
Why does a golf hole play longer than its listed yardage?
Wind, uphill elevation, soft ground, cold air, limited roll, and a back hole location can make a hole play longer. Downhill elevation, firm turf, warm air, and favorable wind may make it play shorter.
Conclusion
Learning to read a golf hole layout turns each hole into a manageable sequence of decisions. Start by identifying the main trouble, finding the widest landing area, choosing a practical route, and planning backward from the green.
You do not need perfect shots or expensive technology to use good course strategy. You need reliable distance information, realistic expectations, and a target that suits your normal game.
Before your next round, study each tee sign for a few seconds and select your route before choosing a club. That simple habit can reduce penalties, improve pace, and help you play every hole with greater confidence.