
Alignment Stick Drills: 7 Simple Golf Drills for Better Aim and Ball Striking

Quick Answer
Alignment stick drills give you visible reference lines for aim, ball position, takeaway, swing path, and body rotation. Start with two sticks on the ground, practice slowly, and use the feedback to make your setup and motion more repeatable. The PGA’s alignment stick drills also show how simple visual boundaries can improve practice.
7 alignment stick drills to try
- Railroad tracks: Train clubface and body alignment toward a precise target.
- Ball-position T: Create a repeatable ball location for different clubs.
- Takeaway guide: Stop the club from disappearing too far inside during the first move back.
- Swing-path channel: Build a visible corridor for the clubhead through the hitting area.
- Swing-plane guide: Use an angled stick as feedback for the club’s general movement.
- Shoulder rotation: Hold a stick across your shoulders to rehearse turning.
- Transfer drill: Remove the sticks and test whether your improved setup survives without them.
Best practice rule
- Begin with rehearsals and half-swings before adding normal speed.
- Never position a stick where a normal swing could strike it dangerously.
Alignment stick drills are some of the simplest ways I know to make golf practice more objective. Instead of guessing where your feet, ball, or club are positioned, you get a clear visual reference.
I use alignment sticks most when something in my setup starts feeling uncertain. This guide goes beyond basic aim and shows how to use them for ball position, takeaway, swing path, rotation, and structured practice.
In This Guide
What Are Alignment Stick Drills?
Alignment stick drills are golf practice exercises that use straight rods as visual or physical reference lines. They can show you where the target line, stance, ball position, club path, or body line sits.
The main benefit is feedback. Golfers often adapt to a poor setup until it looks normal from address.
Definition: An alignment stick is a straight practice rod used to create a visible reference for golf setup or swing practice.
What can you practice with alignment sticks?
- Aim: Check whether the clubface and body are organized around the intended target line.
- Stance: See whether your feet are open, closed, or reasonably parallel.
- Ball position: Repeat where the ball sits relative to your stance.
- Takeaway: Give the club or hands a visual boundary during the first part of the backswing.
- Swing path: Create a corridor that makes exaggerated inside-out or outside-in movement easier to notice.
- Rotation: Use a stick across the shoulders or hips to make turning easier to see.
The sticks don’t fix your swing by themselves. They tell you whether your movement matches the reference you’re trying to train.
That distinction matters. A drill works best when you know which problem you’re measuring before you start.
Section Takeaway: Alignment sticks turn invisible setup and swing relationships into visible references. Use them to measure one specific skill rather than changing several things at once.
How Do You Use Alignment Sticks for Aim?
The simplest alignment stick drill uses two parallel rods like railroad tracks. One represents the ball-to-target line, while the other represents your body line.
This is the drill I return to whenever square alignment starts looking strange. It trains your eyes before it asks you to change your swing.
Drill 1: The railroad-track alignment drill
- Stand behind the ball and select a precise target.
- Lay one alignment stick outside the ball along your target line.
- Place a second stick near your toes, parallel to the first.
- Aim the clubface toward the target-line reference.
- Build your stance along the parallel body line.
- Check your feet, hips, and shoulders before swinging.
- Hit five controlled shots without changing the station.
Think of the two sticks as separate rails. Your clubface aims toward the target, while your body generally sits on a parallel line beside it.
A common mistake is aiming your feet directly at the target. That can make the clubface and shoulders look misaligned even when they feel comfortable.
Drill 2: Add an intermediate target
After building the railroad-track station, find a small spot a few feet ahead of the ball. It should sit directly on your intended starting line.
- Stand behind the ball.
- Connect the ball, intermediate spot, and distant target visually.
- Aim the clubface at the close reference.
- Build your stance after the clubface is set.
- Remove your attention from the rods and hit the shot.
This matters because you can’t place alignment sticks on the ground for every normal shot during a round. The intermediate target gives you an on-course visual reference instead.
The PGA of America regularly emphasizes target awareness, setup, and purposeful practice in its instructional material.
Section Takeaway: Aim the clubface first, then organize your body parallel to the target line. Train with visible rails, but learn to reproduce the picture without them.
How Can Alignment Sticks Fix Ball Position?
Alignment sticks can make ball position much easier to repeat. A simple T-shaped station lets you see both your target line and the ball’s location within your stance.
Ball position matters because it changes where the club meets the ball within the swing arc. Small changes can alter contact, launch, and turf interaction.
Drill 3: The ball-position T drill
- Place one stick parallel to your target line near your toes.
- Lay a second stick perpendicular to it, creating a T shape.
- Use the perpendicular rod as your ball-position reference.
- Build your stance around that reference.
- Hit three to five controlled shots.
- Step away and rebuild the setup from scratch.
Don’t assume one ball position works for every club. Club length, stance width, shot type, and swing characteristics can change the best starting point.
Useful starting points to test
| Club | Starting Ball Position | What to Check |
|---|---|---|
| Wedge | Around the middle area | Centered contact and predictable turf interaction |
| Mid-iron | Slightly forward of center | Contact before the club reaches its lowest point |
| Fairway wood | Farther toward the lead side | Shallow, centered strike |
| Driver | Near the lead heel | Consistent relationship between ball, stance, and tee |
Treat these as starting points rather than laws. Your build and swing may call for a slightly different position.
I prefer moving the reference in small increments. Large changes make it harder to tell what caused the new ball flight.
Pro tip: If you’re unsure whether ball position or swing mechanics cause your contact problem, ask a certified golf instructor to check both together.
Section Takeaway: Use a T-shaped alignment station to make ball position measurable. Change one variable at a time and judge contact before chasing ball flight.

Which Alignment Stick Drills Help Swing Path?
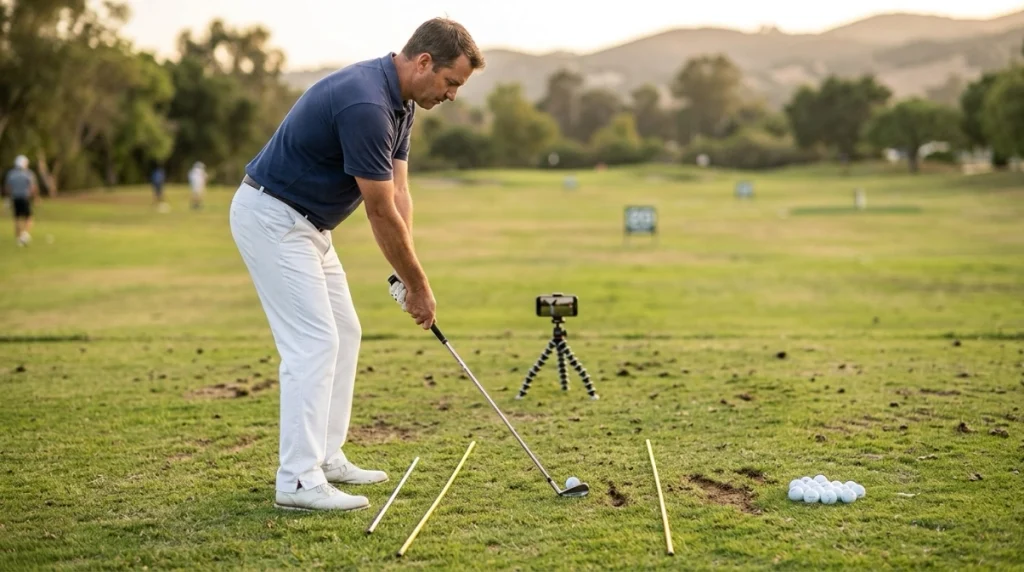
Alignment sticks can create boundaries that make your takeaway and swing direction easier to see. The goal isn’t to force the club onto one universal path.
Instead, use the rods to identify an exaggerated move. Then make slow rehearsals until the movement becomes more neutral.
Drill 4: The takeaway guide
Lay one stick on the ground near your toe line. Use it as a visual reference for how quickly your hands and club move behind you.
- Address the ball with a mid-iron.
- Make a slow takeaway to about halfway back.
- Watch whether the club disappears sharply behind your body.
- Return to address.
- Repeat 10 slow rehearsals.
- Add a ball only after the motion becomes comfortable.
A phone camera from down the line can make this drill more useful. What feels outside, neutral, or inside can look different on video.
Drill 5: The swing-path channel
Two ground sticks can form a corridor for the clubhead. Keep enough space between them so a normal swing never risks hitting a rod.
- Place both sticks generally toward the target.
- Leave a safe channel around the ball.
- Start with short, slow swings.
- Observe where the club enters and exits the hitting area.
- Stop if the drill forces an unnatural or unsafe movement.
The PGA has published alignment-stick drills that use visual channels to help golfers examine swing path. Its instruction also combines rods with video for clearer feedback. :contentReference[oaicite:1]{index=1}
Drill 6: The angled swing-plane guide
An angled alignment stick can provide a visual reference for the club’s general plane. However, this drill requires more care than rods placed flat on the ground.
Never place a rigid stick where your hands, arms, club, or body could strike its exposed end. Use a safe training setup designed for this purpose.
Pro tip: Swing-plane drills can easily become overcorrections. A certified instructor can confirm whether your path or plane needs changing before you rehearse a new movement.
Section Takeaway: Use swing-path sticks as feedback, not as rails that force the club into one position. Slow rehearsal and video are more useful than hitting full-speed balls immediately.
How Do You Practice Rotation With an Alignment Stick?
Holding a stick across your shoulders gives you an obvious picture of how your upper body turns. You can rehearse the motion without hitting a ball.
This is useful when your turn feels vague. The rod exaggerates the shoulder line enough for you to see its direction.
Drill 7: Stick-across-the-shoulders rotation drill
- Take your normal golf posture without a club.
- Hold an alignment stick across your shoulders.
- Cross your arms over the stick to hold it safely.
- Turn into a comfortable backswing position.
- Pause and notice where each end points.
- Rotate through toward a balanced finish.
- Repeat five to ten times without rushing.
Keep your posture comfortable during the rehearsal. Don’t chase a huge shoulder turn if it causes your balance or body position to break down.
Add a ground reference
Place another stick on the ground along the target line. Now you can compare your shoulder movement with a fixed reference.
- Check your starting shoulder alignment.
- Make a slow backswing turn.
- Return through the address area.
- Rotate into the finish.
- Repeat without a ball first.
The purpose is awareness rather than hitting a specific number of degrees. Golfers differ in mobility, posture, stance, and swing style.
That’s also why I avoid copying another player’s exact turn. The useful question is whether your rotation supports balance and consistent contact.
Pro tip: Stop if a rotation drill causes pain or unusual strain. A qualified instructor can help with technique, while physical discomfort should be assessed by an appropriate health professional.
What Is the Best Alignment Stick Practice Routine?
The best routine progresses from visible feedback to normal golf shots. If you use the sticks for every ball, you can become dependent on the practice station.
I prefer a three-stage pattern: build the reference, hit controlled shots, then remove the aid.
A simple 30-ball alignment stick session
| Balls | Drill | Main Goal |
|---|---|---|
| 1–5 | Railroad-track drill | Clubface and body alignment |
| 6–10 | Ball-position T | Repeatable setup |
| 11–15 | Takeaway rehearsal | Controlled first move |
| 16–20 | Path channel | Movement awareness |
| 21–25 | Remove one stick | Reduce visual dependence |
| 26–30 | No training aids | Transfer the skill to normal golf |
Use different clubs
Don’t test your alignment only with a 7-iron. Your visual picture changes as the club becomes longer or shorter.
- Start with a wedge.
- Move to a mid-iron.
- Add a hybrid or fairway wood.
- Finish with the driver.
Keep the target specific throughout the session. Directional practice becomes much less useful when you’re simply hitting toward the middle of the range.
Finish without the sticks
The final five or ten balls are the most important. Remove the training aids and complete your normal pre-shot routine.
If your setup immediately changes, return to the drill briefly. Then test the unaided version again.
As of 2026, alignment sticks remain practice tools rather than objects you can simply place down to build your stance during competitive play. Check the current USGA Rules of Golf or The R&A guidance when you’re unsure about training-aid use during a round.
Section Takeaway: Good practice gradually removes the external reference. The goal is to make proper alignment and setup repeatable when no stick is on the ground.
Alignment Stick Drills FAQ
What is the best alignment stick drill for beginners?
The railroad-track drill is the best place to start. Put one stick along the target line and another parallel to it near your toes. Aim the clubface first, build your stance, and hit controlled shots before removing the sticks.
How many alignment sticks do you need for golf practice?
Two sticks cover most basic alignment drills. They can create parallel aim lines, a ball-position T, or a swing-path channel. Some advanced practice stations use more, but beginners usually gain more from mastering one or two references.
Can alignment stick drills fix a slice?
They can help identify alignment, takeaway, or swing-path patterns associated with a slice, but they don’t guarantee a cure. A slice can involve clubface angle, swing direction, grip, setup, or several factors working together.
Can you use alignment sticks for ball position?
Yes. Place one stick parallel to your target line and a second perpendicular to it. The second stick becomes a repeatable reference for where the ball sits relative to your stance.
Should I hit full swings during alignment stick drills?
Start with rehearsals, half-swings, and controlled shots. Increase speed only when the setup is safe and the movement remains consistent. Full-speed swings aren’t necessary for every drill.
Are alignment sticks allowed during a round of golf?
You can carry training equipment, but using an object to assist with alignment, stance, or swing mechanics during a round can violate the Rules of Golf. Check the current USGA or R&A rules before using any training aid during competition.
Can I use golf clubs instead of alignment sticks?
A spare club can work for some ground-based alignment drills. Keep it outside the swing area and make sure the club cannot be struck. Purpose-built rods are often easier to position because they’re light and highly visible.
Build Better Golf Practice With Clear Feedback
Alignment stick drills work because they replace guesswork with visible feedback. Two inexpensive rods can help you check aim, ball position, takeaway, swing direction, and rotation.
Start with the railroad-track drill. Once that feels natural, add the T drill, takeaway guide, path channel, and rotation rehearsals.
- Practice slowly before adding speed.
- Train one variable at a time.
- Keep every stick safely outside the strike zone.
- Use video when feel and reality don’t match.
- Finish every session without the sticks.
The last step matters most. Your alignment station should teach you what a repeatable setup looks like, then disappear when it’s time to play golf.