
Alignment Drill: How to Aim and Set Up Square in Golf

Quick Answer
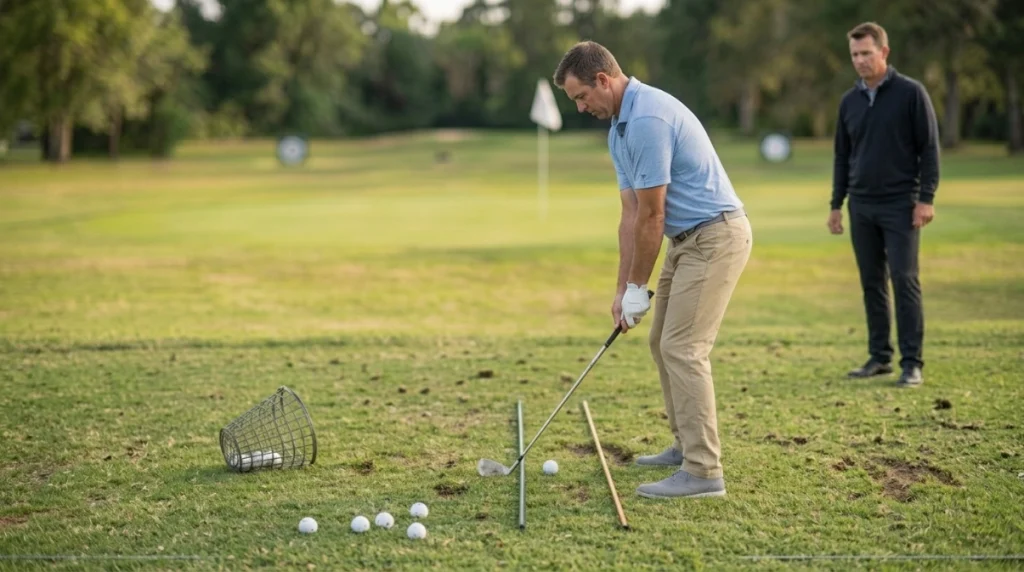
The best golf alignment drill uses two clubs or alignment sticks as parallel “railroad tracks.” Point the outside stick at your target, place the second stick along your toe line, and make controlled swings without changing your natural motion. The PGA’s alignment guidance also recommends using an intermediate target during your setup.
Quick alignment steps
- Choose a target: Select a precise flag, tree, or range marker.
- Build the target line: Place one stick just outside the ball, pointing toward the target.
- Set your body line: Position another stick parallel to the first along your toes.
- Square the clubface: Aim the face at the target before setting your feet.
- Hit controlled shots: Start at half speed and check the starting direction.
How to verify it
- Record your setup from behind or ask a partner to confirm that both sticks remain parallel.
Golf alignment sounds simple until you stand over the ball. From that angled viewpoint, square often looks closed, while aiming right can feel perfectly straight.
I use this alignment drill whenever my shots begin missing in one direction. It separates an aiming mistake from a swing problem before I start changing mechanics.
In This Guide
What Is a Golf Alignment Drill?
A golf alignment drill is a practice exercise that gives you visible reference lines for the target, clubface, feet, hips, or shoulders. It helps you learn what a square setup looks and feels like.
Alignment is the relationship between the clubface, your body, and the intended target line. It does not mean every part of your body points directly at the flag.
The target line is an imaginary straight line extending from the ball toward your chosen target. For a standard square setup, your body line runs parallel and left of it for a right-handed golfer.
Left-handed golfers reverse that picture. Their body line normally appears parallel and right of the target line.
Why alignment changes ball flight
The clubface strongly influences where the ball starts. The swing path influences how the ball curves relative to that starting direction.
Poor alignment can therefore create several misleading patterns:
- Pulled shots: Your body and clubface may both point left.
- Pushes: The whole setup may aim farther right than you realize.
- Pull-slices: An open stance can encourage a leftward path while the face remains open to that path.
- Push-hooks: A closed setup may send the path right while the clubface closes relative to it.
- Inconsistent contact: Subconscious steering can change your balance and strike location.
When I check alignment first, many apparent swing faults become easier to understand. Sometimes the swing is producing exactly the shot the setup requested.
Section Takeaway: An alignment drill supplies objective reference lines. Use those lines before deciding that your swing needs a mechanical change.
How Do You Perform the Basic Alignment Drill?

Use two alignment sticks, two spare clubs, or two straight pieces of dowel. The sticks should create parallel target and body lines.
The setup takes less than two minutes. Choose a flat range station so slopes do not distort your view.
Two-stick railroad-track drill
- Stand behind the ball. Choose one small target instead of aiming at the entire range.
- Set the target-line stick. Place it outside the ball and point it toward your target.
- Add the body-line stick. Lay it near your toes, parallel to the first stick.
- Place the ball safely. Leave enough room to swing without striking either stick.
- Aim the clubface first. Set its leading edge perpendicular to the target-line stick.
- Build your stance. Position your feet, knees, hips, and shoulders around the aimed clubface.
- Make three rehearsals. Look at the target, return your eyes to the ball, and hold your finish.
- Hit five half-swings. Note each ball’s starting direction before judging its curve.
Leave roughly four to six inches between the clubhead and the outside stick. This provides a clear reference without creating a collision risk.
The exact spacing between the tracks depends on your stance width. What matters is that the sticks remain parallel.
A simple 15-ball practice plan
| Shots | Club | Main goal | Swing length |
|---|---|---|---|
| 1–5 | Wedge | Square face and centered contact | Half |
| 6–10 | 7-iron | Consistent starting direction | Three-quarter |
| 11–15 | Driver | Pre-shot routine and target commitment | Smooth full swing |
Score one point when your ball starts inside your intended window. A practical window might be five yards wide for wedges and wider for a driver.
Track the start line, not just the final location. Wind and curve can move a well-started shot away from the target.
Pro tip: Ask a PGA-certified instructor to check your shoulders and swing path if the sticks create discomfort or make your motion feel forced.
Section Takeaway: Aim the clubface before positioning your body. Begin slowly, measure the starting direction, and increase speed only after the setup becomes repeatable.
Should Your Feet and Clubface Aim at the Same Place?
No. In a neutral setup, the clubface points along the target line while your feet stand on a parallel body line.
Think of railway tracks. Both rails travel in the same direction, but they do not meet at your nearby target.
Clubface, feet, hips, and shoulders
Each setup component has a different job:
- Clubface: Aim it at the intended starting line.
- Feet: Use them as the easiest visible body reference.
- Knees and hips: Keep them generally coordinated with the stance unless the shot requires adjustment.
- Shoulders: Check them carefully because they can aim differently from your feet.
Many golfers align their feet correctly while leaving their shoulders open. That combination can encourage an out-to-in swing direction.
Others close their shoulders while reaching for the ball. This can alter posture, path, and contact without moving the feet.
Square, open, and closed setups compared
| Setup | Body line | Common use | Possible mistake |
|---|---|---|---|
| Square | Parallel to target line | Standard full shots | Assuming feet alone control alignment |
| Open | Left for right-handed player | Some chips, pitches, and bunker shots | Pulling across full shots unintentionally |
| Closed | Right for right-handed player | Intentional shape or specialized shot | Starting routine shots too far right |
Open and closed stances are not automatically faults. They become problems when they appear unintentionally or conflict with your planned ball flight.


Which Alignment Mistakes Cause Bad Shots?
The most common mistake is aiming the body directly at the target. This points the clubface and body lines toward the same distant spot instead of keeping them parallel.
Aiming with your feet only
Toe alignment is easy to see, but it does not reveal everything. Your hips or shoulders may point elsewhere.
Lay a club across your shoulders during a rehearsal, then check where it points. Remove it before hitting any ball.
Choosing a target that is too broad
“Toward the green” is not precise enough. Pick a flag edge, tree branch, discolored grass patch, or range sign.
A narrow target improves feedback. You can then tell whether the ball started on your chosen line.
Aiming after taking your stance
Golfers often plant their feet first and twist the clubface afterward. That sequence introduces tension and changes posture.
Use this order instead:
- Select the target from behind the ball.
- Choose an intermediate target.
- Aim the clubface at that reference.
- Build your stance around the clubface.
- Look once more and swing.
Changing the swing to fix poor aim
This is the costliest alignment mistake. A golfer who unknowingly aims right may pull the club left to find the target.
The compensating move can become habitual. When the golfer finally aims square, the same move produces a pull.
A USGA example shows how a five-degree directional error can produce a 21-yard miss over a 250-yard drive. Small alignment errors matter more as distance increases.
Section Takeaway: Check the clubface, shoulders, and starting direction before rebuilding your swing. Poor aim often creates compensations that resemble mechanical faults.
Which Alignment Drill Variations Should You Practice?
Use variations only after mastering the basic parallel-stick setup. Each version should test one specific skill.
Intermediate-target drill
Choose a spot about one to three feet ahead of the ball. A leaf, grass mark, or broken tee works well.
Aim the clubface through that spot. This is easier than repeatedly looking between the ball and a distant flag.
Alignment gate drill
Place two tees several feet ahead of the ball to create a starting gate. The gate tests direction without forcing your club through a narrow impact channel.
- Wedges: Begin with a gate around two feet wide.
- Mid-irons: Make the gate slightly wider.
- Driver: Use a forgiving window that rewards direction without demanding perfection.
Reduce the gate width when seven of ten shots start through it. Widen it if you begin steering instead of swinging freely.
Shoulder-line drill
Take your normal setup with ground sticks in place. Ask a partner to hold another stick lightly across your shoulders.
Compare its direction with your toe line. This quickly reveals an open or closed upper body.
Random-target drill
Remove the sticks after ten rehearsals. Change the target and club before every shot.
Go through your complete routine each time. Random practice resembles course play more closely than hitting repeatedly toward one flag.
Putting alignment drill
Choose a straight putt of about five feet. Place two sticks parallel to the intended line, leaving enough space for the putter head.
Roll ten putts while noting the ball’s starting line. The PGA’s home putting drills suggest a four-to-six-inch channel for a similar exercise.
A chalk line or string can provide another straight reference on a practice green. Confirm that the putt is straight before judging your stroke.
Section Takeaway: Match each variation to one measurable goal. Test alignment, starting direction, or routine separately before combining them.
How Do You Take Better Alignment to the Course?

You cannot place an alignment rod beside your feet to help take your stance during a round. Build a legal routine that reproduces the same visual picture.
The USGA’s equipment guidance under Rule 4.3 restricts using training aids to gain help with alignment during a round. Practice sticks belong on the range.
Use the same pre-shot routine
- Assess the shot. Consider the lie, wind, trouble, and preferred miss.
- Select a precise target. Match it to your intended shot shape.
- Stand behind the ball. Visualize the starting line.
- Find an intermediate spot. Choose one close enough to see from address.
- Aim the clubface. Set it before widening your stance.
- Set your body parallel. Avoid pointing your toes directly at the distant target.
- Look and swing. Trust the setup instead of making a late correction.
I like to hit the final three range balls exactly like course shots. I change clubs, step away, choose targets, and restart the routine.
That habit exposes whether the drill has taught a skill or only created dependence on the sticks. The goal is independent alignment.
How often should you practice?
Spend 10 minutes on alignment near the start of each range session. That is enough to calibrate your eyes without dominating the entire practice.
A useful weekly schedule looks like this:
- Session one: Basic railroad-track drill with wedges and irons.
- Session two: Intermediate-target and starting-gate practice.
- Session three: Random clubs and course-style routines without sticks.
Film one setup each month from directly behind the hands. A poor camera angle can mislead you, so position the lens carefully.
Pro tip: Have a certified instructor establish the correct camera position and neutral baseline before using video for technical changes.
Section Takeaway: Range sticks train the picture, but your routine transfers it. Finish practice without aids so you can aim confidently on the course.
Golf Alignment Drill FAQ
Can I use golf clubs instead of alignment sticks?
Yes. Place two spare clubs on the ground as parallel reference lines. Keep their heads and shafts safely outside the swing area, and never hit shots when a club could contact your clubhead.
Where should an alignment stick point?
The outside stick should follow the ball’s intended starting line. A second stick near your toes should run parallel to it rather than pointing directly at the same distant target.
Why do I feel aimed left when I am square?
Your eyes view the target from beside the ball, which changes perspective. If you have aimed right for months, a square setup can initially look left. Use sticks and video until the new picture becomes familiar.
Can alignment sticks fix a slice?
They can correct setup and reveal swing direction, but they do not automatically fix every slice. A slice can also involve an open clubface, heel contact, grip problems, or an out-to-in swing path.
Should my shoulders match my feet?
For a standard neutral shot, they should generally remain coordinated and parallel to the target line. Specialized shots may require different alignments, but those adjustments should be intentional.
How many balls should I hit during an alignment drill?
Start with 15 focused balls. Use five wedges, five mid-irons, and five drivers or fairway woods. Stop if you lose concentration because careless repetitions can reinforce the wrong setup.
Are alignment sticks allowed during a competitive round?
You may carry alignment rods, but using one as a training aid to help your stance, swing plane, ball position, or alignment during the round can breach Rule 4.3. Ask the competition committee when uncertain.
Build Alignment Before Rebuilding Your Swing
The basic alignment drill gives you an honest picture of your aim. Two parallel sticks can reveal mistakes that ball flight alone cannot explain.
Start with a precise target, aim the clubface first, and position your body parallel to the target line. Measure where shots begin before judging where they finish.
Practice with the guides, then remove them. When the same setup survives without visual aids, the drill has done its job.