
Perfect Golf Setup: Grip, Stance, Posture, Alignment, and Ball Position

Quick Answer
A perfect golf setup puts you in a balanced, athletic position before the club starts moving. Build it around a comfortable grip, square clubface, correct ball position, balanced posture, consistent distance from the ball, and body lines that match your intended shot. The PGA of America’s guidance on golf fundamentals reinforces why grip, alignment, posture, and stance deserve regular attention.
Your setup checklist
- Clubface first: Aim the clubface at the starting line before arranging your body.
- Comfortable grip: Hold the club securely without creating unnecessary tension in your forearms.
- Athletic posture: Bend from the hips, soften the knees, and keep your balance near the middle of your feet.
- Correct ball position: Move the ball progressively forward as the club gets longer.
- Parallel alignment: Keep your feet, knees, hips, and shoulders coordinated with your intended target line.
- Repeatable routine: Build your setup in the same order before every normal shot.
Best way to verify it
- Use a mirror, phone video, and alignment sticks during practice instead of relying only on feel.
A good golf swing becomes much easier to repeat when the address position is dependable. I like to treat setup as a pre-swing system rather than a pose that must look identical for every golfer.
Your body proportions, mobility, club length, and intended shot all matter. This guide gives you reliable starting points, plus simple checks you can adjust to your own game.
In This Guide
What Does a Perfect Golf Setup Look Like?
A perfect golf setup is a balanced and repeatable address position that gives the club room to move while matching the shot you intend to play. It includes grip, clubface aim, stance width, posture, alignment, ball position, and distance from the ball.
It does not mean copying one professional golfer exactly. Players have different heights, arm lengths, mobility, clubs, and swing patterns.
Definition: Golf setup, also called the address position, is the position of the golfer, club, and ball immediately before starting the swing.
The seven parts of a reliable setup
I check setup in a simple order. Doing that prevents one small problem from forcing several compensations later.
- Grip: How your hands sit on the handle.
- Clubface: Where the face is aimed before the swing.
- Ball position: Where the ball sits between your feet.
- Stance: The width and orientation of your feet.
- Posture: How you bend, flex, and balance your body.
- Distance: How far you stand from the golf ball.
- Alignment: How your body lines relate to the target line.
Why setup matters so much
The swing lasts only a moment. Your setup gives you time to organize conditions before that movement starts.
A poor ball position can change where the club reaches the ground. Poor alignment can encourage an unnecessary swing-path correction.
- A ball too far back can encourage a lower launch or overly steep strike.
- A ball too far forward can make solid contact harder with many irons.
- Standing too close can crowd your arms through impact.
- Standing too far away can pull your balance toward your toes.
- Excessive grip tension can restrict natural wrist and arm movement.
The goal is not visual perfection. The goal is to remove avoidable variables before you swing.
Section Takeaway: A perfect setup is a repeatable system, not a single frozen pose. Get the clubface, ball, body, and balance organized before worrying about complicated swing positions.
How Should Your Grip, Stance, and Posture Feel?

Your grip should feel secure, while your stance and posture should feel athletic rather than rigid. You want enough structure to control the club without creating tension that restricts movement.
Start with a neutral golf grip
Your hands are your only direct connection to the club. Their position can influence how easily the clubface returns toward the intended direction.
A neutral grip is a useful baseline. It gives you somewhere sensible to start before making individualized changes.
- Place the handle diagonally through the fingers of your lead hand.
- Wrap the lead hand around the grip without squeezing excessively.
- Add the trail hand so both hands work as one unit.
- Keep your forearms relaxed enough to move naturally.
- Use interlocking, overlapping, or ten-finger placement according to comfort and control.
A grip does not need to feel weak to be relaxed. Secure contact and excessive pressure are different things.
Build stance width around the club
Stance width affects stability and mobility. Longer clubs usually benefit from a wider base than short wedges.
- Wedges: Start slightly narrower than shoulder width.
- Mid-irons: Start around shoulder width.
- Fairway woods: Use a stable, moderately wide base.
- Driver: Start around shoulder width or slightly wider.
Those are starting points, not measurements every golfer must copy. Your build and mobility should influence the final position.
Bend from the hips
Good golf posture begins with a hip hinge. Push your hips slightly back while allowing your upper body to tilt forward.
Then soften your knees. Avoid turning the address position into a deep squat.
- Keep your chest comfortably open.
- Let your arms hang naturally below your shoulders.
- Avoid excessive rounding through the upper back.
- Keep enough knee flex to feel athletic.
- Distribute pressure through the middle of each foot.
The PGA of America offers a useful golf posture drill built around maintaining a stable spine angle while turning.
Check your balance before swinging
Balance gives you one of the fastest setup checks. You should not feel trapped on your heels or pulled toward your toes.
Try rocking gently from heels to toes before settling near the middle of your feet. Your body should feel ready to rotate without needing to regain balance first.
Pro tip: If your posture causes pain, severe restriction, or repeated loss of balance, work with a qualified PGA professional and an appropriate healthcare professional rather than forcing a textbook position.
Section Takeaway: Hold the club securely, build an athletic stance, hinge from the hips, and stay balanced. A functional setup should feel stable enough to control the club and free enough to move.
Where Should the Ball Be in Your Golf Stance?
Ball position normally moves forward as clubs become longer. A practical baseline runs from near the middle of the stance with short clubs toward the inside of the lead heel with the driver.
Use your sternum and heels as reference points
Many golfers judge ball position only by looking at their toes. That can become misleading when one foot is flared more than the other.
Your heels and center of your body provide more consistent references. Check them when practicing.
- Short wedges: Around center or slightly forward of center.
- Mid-irons: Roughly one to two ball widths forward of center.
- Long irons and hybrids: Farther forward than a mid-iron.
- Fairway woods: Forward, but normally short of driver position.
- Driver: Around the inside of the lead heel as a baseline.
For a right-handed golfer, the lead side is the left side. Reverse those references if you play left-handed.
Why ball position changes
Each club has a different length and loft. Your intended strike also changes between an iron played from turf and a driver played from a tee.
With many normal iron shots, you want the club to contact the ball before reaching the lowest part of the swing. With a driver, the forward position helps support a different strike and launch pattern.
How far should you stand from the golf ball?
Stand far enough away for your arms to hang naturally. Avoid deliberately reaching for the ball or pulling your hands tightly into your legs.
The correct distance changes because club lengths and lie angles change. Your body proportions also matter.
- Take your normal posture first.
- Let your arms hang without forcing them outward.
- Place the club into those naturally hanging hands.
- Check that your balance stays centered.
- Make a small waggle to confirm you have room to move.
If you continually hit the heel or toe, distance from the ball is worth checking. Do not assume every contact problem requires a swing overhaul.
Ball position should support the intended shot
These positions are baselines for standard shots. Specialty shots may require deliberate changes.
- A low punch may use a slightly farther-back ball position.
- A bunker shot may use a more forward position with an open face.
- A chip may use a narrower stance and different pressure distribution.
- A deliberate shot shape may involve small setup adjustments.
Learn your neutral position first. Variations become easier when you know exactly what you are changing.
Section Takeaway: Let ball position progress forward as club length increases, and let your arms determine a natural distance from the ball. Use specialty positions only when the shot calls for them.


How Should You Align Your Body and Clubface?
Aim the clubface at your intended starting line first. Then organize your feet, knees, hips, and shoulders in relation to that line.
Many golfers do the opposite. They aim their body directly at the target and unknowingly send the clubface somewhere else.
Think of two parallel tracks
The familiar railroad-track image works well for a neutral shot. The ball and clubface occupy one track, while your body sits on the parallel track.
The PGA’s alignment guidance uses the same concept to separate the target line from the body line.
- Target line: The line from the ball toward your intended starting point.
- Body line: The line represented mainly by your feet, knees, hips, and shoulders.
For a right-handed golfer hitting a neutral shot, those body lines often appear parallel-left of the actual target line. Left-handed golfers reverse the picture.
Use an intermediate target
A distant flag or tree can be hard to aim at from beside the ball. Pick a small spot only a short distance in front of the ball on your intended starting line.
- Stand behind the ball and choose the shot.
- Identify the target or starting line.
- Choose a nearby mark on that line.
- Aim the clubface at the nearby mark.
- Build your stance around the clubface.
This process gives your eyes a smaller reference. It also stops you from endlessly shuffling your feet after addressing the ball.
Practice alignment without creating a Rules problem
Alignment sticks are excellent training aids on a practice range. They make the relationship between your target line and body line easy to see.
During a round, however, the Rules restrict setting an object down to help with aiming or taking your stance. Current USGA Rules clarifications explain Rule 10.2b and its restrictions on alignment help.
Practice with visual aids until the picture becomes familiar. Remove those training aids when playing under the Rules.
Do not make square alignment a prison
Golfers sometimes intentionally alter alignment to play a fade, draw, recovery shot, or uneven lie. That does not make the setup wrong.
The important skill is knowing your neutral baseline. Intentional changes should be decisions, not accidents.
Section Takeaway: Aim the clubface before your body, use a nearby reference point, and learn what neutral alignment looks like. Once that baseline is dependable, intentional shot-shaping adjustments become much clearer.
How Does Golf Setup Change for Different Clubs?
Your setup should evolve with club length and the type of strike required. A driver and wedge should not look identical at address.
The table below gives practical starting positions for normal full shots. Treat them as checkpoints rather than mandatory measurements.
| Club | Typical Ball Position | Stance | Setup Priority |
|---|---|---|---|
| Wedge | Center to about 1 ball forward | Slightly narrower | Balance and predictable turf contact |
| 7-Iron | About 1–2 ball widths forward of center | Around shoulder width | Centered balance and ball-first strike |
| Hybrid | About 2–3 ball widths forward of center | Moderate | Avoid treating it like a teed-up driver |
| Fairway Wood | Forward, inside driver position | Moderately wide | Room for a sweeping but controlled strike |
| Driver | Around inside of lead heel | Shoulder width or slightly wider | Stable base, forward ball position, free turn |
Wedge setup
Short clubs require less reach, so the stance can become narrower. Keep your posture athletic and avoid crowding the ball simply because the shaft is shorter.
For a standard full wedge, start around center or slightly forward. Specialty pitches and chips use different setups.
Mid-iron setup
A 7-iron is useful for establishing your baseline. Start around shoulder width with the ball modestly forward of center.
Let your hands hang naturally. You should feel balanced enough to finish the swing without falling toward the ball.
Hybrid and fairway-wood setup
Hybrids and fairway woods are longer, so the ball moves forward. Your stance also becomes slightly wider.
Do not automatically place every hybrid beside the lead heel. Many golfers make cleaner contact when the hybrid remains behind their driver position.
Driver setup
The driver uses the longest club and normally the most forward ball position. Start around the inside of your lead heel.
A wider base can provide stability without locking your hips. Your upper body should still be able to turn freely.
Why club fitting can change the picture
Club length and lie angle influence how naturally you can address the ball. Lie angle describes the relationship between the shaft and sole when the club is positioned for play.
Shaft length, grip size, clubhead design, and your proportions can also change comfort. That is one reason two golfers may look different while both remain well balanced.
Pro tip: If standard posture makes your clubs look obviously too upright, too flat, too long, or too short, ask a qualified club fitter to check the equipment before forcing your body to compensate.
Section Takeaway: Allow your setup to change as clubs get longer. Ball position generally moves forward and the stance becomes wider, but balance and natural arm hang remain consistent priorities.
How Do You Make Your Golf Setup Repeatable?
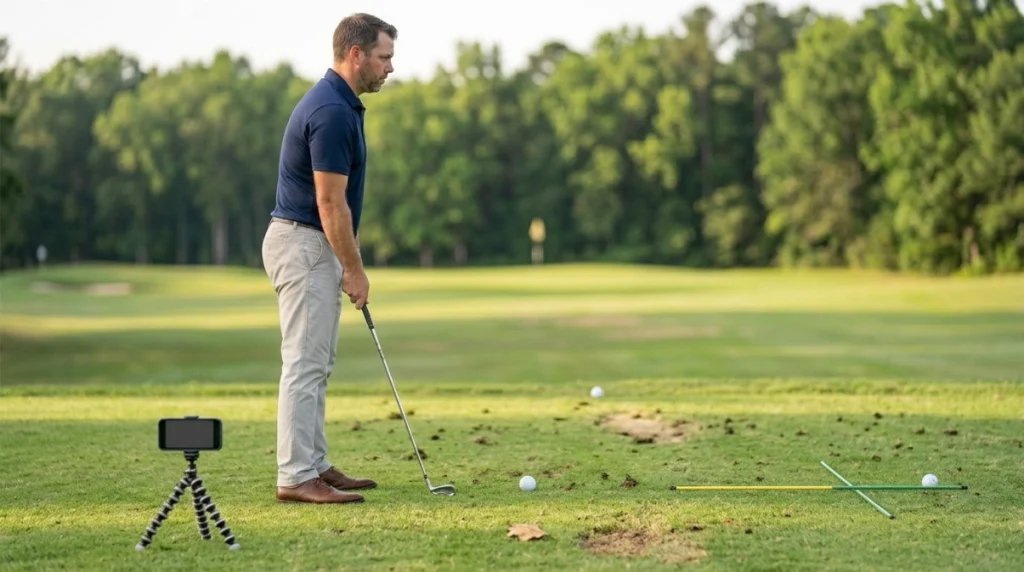
Build your setup in the same sequence before each standard shot. A consistent process reduces guessing and makes setup errors easier to diagnose.
Use this six-step pre-shot setup routine
- Choose the shot. Decide the target, club, trajectory, and intended starting line.
- Stand behind the ball. See the line before moving into your stance.
- Select an intermediate target. Find a small mark a few feet ahead.
- Aim the clubface. Set the face before arranging your feet.
- Build posture and stance. Set ball position, width, hip hinge, and balance.
- Look and swing. Confirm the target, then commit instead of rebuilding the setup repeatedly.
The routine should remain short enough to use on the course. You are building familiarity, not a long technical checklist.
Watch for these common golf setup mistakes
- Aiming the body first: This can make clubface alignment difficult to judge.
- Using one ball position: Driver and wedge normally need different starting positions.
- Reaching for the ball: Excessive reach can pull pressure toward the toes.
- Crowding the ball: Too little space can restrict your arms.
- Squatting instead of hinging: Too much knee bend can make rotation awkward.
- Squeezing the grip: Excessive tension often spreads into the forearms and shoulders.
- Changing several things at once: That makes it hard to learn what fixed the problem.
Use three simple setup drills
You do not need complicated technology to check your fundamentals. Basic visual feedback can reveal large differences between feel and reality.
1. Alignment-stick station
- Place one stick along your target line during range practice.
- Place a second parallel to it for your feet.
- Hit several balls without changing the station.
- Step away, rebuild your setup, and compare it again.
2. Mirror posture check
- Take your normal address position without hitting a ball.
- Check your hip hinge and knee flex.
- Confirm that your arms hang rather than reach.
- Notice whether your balance feels centered.
3. Ball-position station
- Use a club or stick perpendicular to your toe line during practice.
- Place a wedge, mid-iron, hybrid, and driver one at a time.
- Note the actual ball location for each club.
- Repeat until those positions become familiar.
Change one variable at a time
This is the setup habit I return to most. If contact suddenly changes, I check one variable before rebuilding the entire swing.
Start with clubface aim, ball position, and balance. Those checks are fast and easy to verify.
The PGA’s recent ball-striking guidance continues to emphasize grip, stance, posture, and alignment as core fundamentals rather than details reserved for beginners.
Know when setup is not the whole problem
A correct-looking address position cannot guarantee a good shot. Clubface control, swing path, strike location, speed, and impact conditions still matter.
Setup gives those movements a better starting point. It should simplify the swing rather than become another source of tension.
Pro tip: If your setup appears consistent but your normal miss remains severe, a certified PGA professional can use ball flight and video to identify whether the cause happens before or during the swing.
Section Takeaway: Use one short setup sequence, verify it with visual feedback, and change one variable at a time. Repeatability matters more than chasing a new address position every practice session.
Perfect Golf Setup FAQs
What is the correct golf setup for beginners?
Beginners should start with a neutral grip, athletic posture, balanced pressure, and a stance around shoulder width for a mid-iron. Aim the clubface first, position the ball slightly forward of center with a mid-iron, and let the arms hang naturally.
How wide should my golf stance be?
Stance width depends on the club and golfer. A mid-iron can start around shoulder width, wedges slightly narrower, and a driver around shoulder width or slightly wider. Choose a width that provides stability without restricting your turn.
Should my weight be on my toes or heels at address?
Neither extreme is a good neutral starting point. Feel balanced through the middle of your feet so you can rotate without falling toward the ball or sitting backward during the swing.
Where should the golf ball be for a 7-iron?
A practical 7-iron starting point is about one to two ball widths forward of the center of your stance. Individual technique and club specifications can alter that position, so verify it through contact and professional instruction when needed.
Where should the golf ball be for a driver?
For a normal driver shot, start with the ball around the inside of your lead heel. Right-handed golfers use the left heel as the lead-side reference, while left-handed golfers use the right heel.
How far should I stand from the golf ball?
Stand where your arms can hang naturally from your shoulders without reaching or becoming crowded. Because club length and body proportions vary, there is no single distance in inches that works for every player and club.
Can I use alignment sticks during a round?
Alignment sticks are useful during practice. When playing a round under the Rules of Golf, you cannot set an object down to help aim or take your stance for the stroke, so learn the visual picture during practice and remove the training aid for play.
Final Takeaway: The perfect golf setup is the one you can build consistently while staying balanced, comfortable, and matched to the club in your hands. Start with clubface aim, grip, posture, ball position, distance, and alignment before chasing complicated swing changes.
Take a mid-iron to the range and build the same setup for ten shots. Then check it with an alignment stick or phone video, correct one variable, and repeat the process until the address position starts feeling automatic.